Setting up a business card print file isn't as complicated as it looks — yet it isn't only design newcomers who get it wrong; even working graphic designers overlook the print file. The more diligent print shops will charge to fix problems on your artwork, but most won't touch the file itself for fear of altering the design. The good news: building a proper print file is simpler than you'd think. If your designer doesn't know how — or forgot — point them to this tutorial. Below we start from zero: the basic settings for a card file, and how to handle finishing (black plate) artwork.
Basic settings for a card file
- The standard finished card size is 90 x 54 mm, and the bleed adds 1 mm on every side of the finished size — so 92 x 56 mm.
- If your card is a custom size, the bleed is still an extra 1 mm on each side.
- Note: text, images, framed design elements or negative space must sit about 5 mm inside the trim line on all four sides. Otherwise, after cutting, the card can look skewed or unevenly margined — text or images may even be trimmed off.
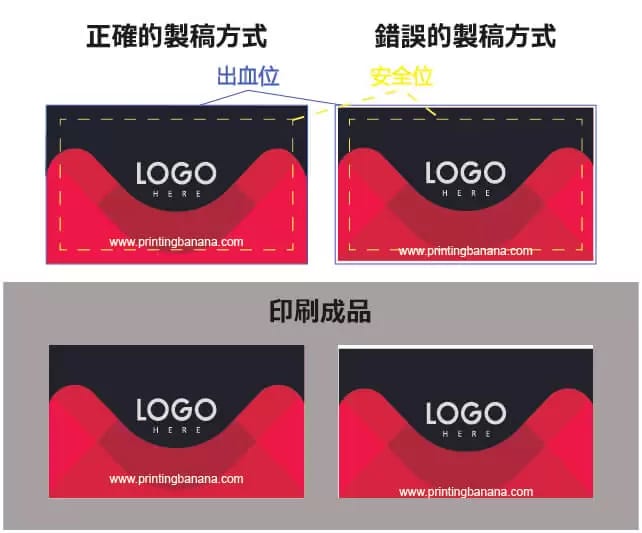 *In the example, the incorrect print file (on the right) has two problems. First, it prints with a white edge, because there's no bleed. Second, the text sits right on the edge, unlike the design mock-up. So to guarantee print quality, you must add bleed and keep text inside the safe area. The standard safe area is 4 mm in from the finished size on every side, 3 mm at the absolute minimum.
Further reading: Print Basics: A Closer Look at "Bleed" in Print Files, With a Bleed Setup Guide
Bi-fold card files
- The standard bi-fold card finished size is 90 x 108 mm, with bleed adding 1 mm on every side of the finished size — so 92 x 110 mm.
- When you build a bi-fold card file, the cover panel must be rotated 180°, otherwise the finished print will have problems.
- To make finishing easier, mark the crease (fold) line position beside the artwork.
Foil-stamping / embossing black plate
- You need to create a black plate for the foil-stamping / embossing areas, and all special-process print jobs accept AI files only, as shown below:
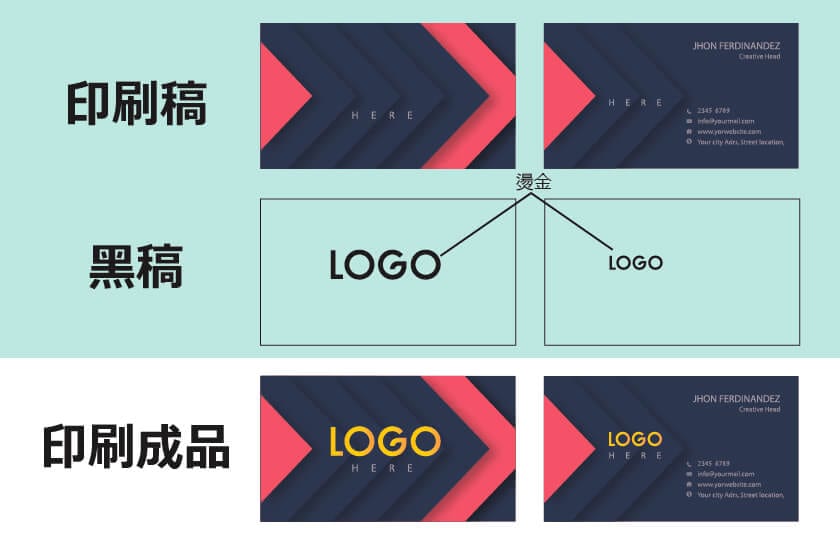
Making a foil / emboss black plate — points to note
- The text or graphics to be finished should not remain on the print file, otherwise you'll get overprinting.
- Avoid text or graphics that are too small, too thin, or too intricate — the finished effect will suffer.
- Text must be no smaller than 8 pt, and lines no thinner than 0.6 pt, or the finish won't show clearly — it may not even take.
- Keep at least 0.7 mm between any two foil / emboss areas, otherwise the two will blur together.
- Keep the finishing areas within the finished size / die-cut range where possible; otherwise the foil may flake off under the finishing pressure.
- A 2–3 mm tolerance on the finishing position is normal.
- We don't recommend printing text or colour under an embossing area, as the effect won't stand out.
UV coating black plate
- You need to create a black plate for the UV areas too, and all special-process print jobs accept AI files only, as shown below:
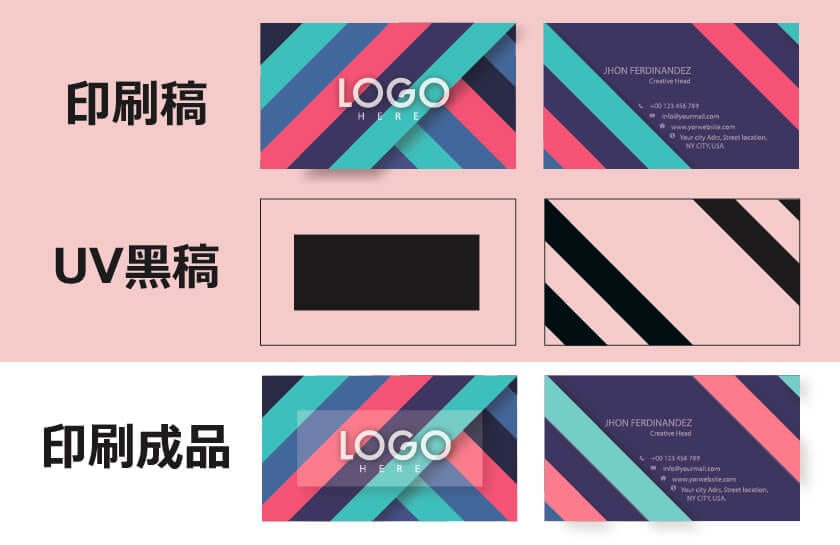
Making a UV black plate — points to note
- Avoid text or graphics that are too small, too thin, or too intricate — the finished effect will suffer.
- Text must be no smaller than 8 pt, and lines no thinner than 0.6 pt, or it won't show clearly.
Punched rounded-corner cards
- Printing Banana's rounded-corner cards have a 4 mm corner radius. Just note on your normal card design that you want rounded corners — you don't need to add the rounded corners on the design file itself.
- The rounded corners are punched with a mould, so a slightly uneven corner is normal. For perfectly smooth, clean corners you'd need a custom cutting die, though that costs more.
Prep your file with these settings and your cards will come off press clean. If you'd rather we check the file for you — or you're unsure about a black plate — message us on WhatsApp at +852 3001 5678 (English is fine). We deliver across Hong Kong and Macau.